Having spent the majority of my culinary years eating and cooking in the era of crisp-tender vegetables, my only experiences with mushy vegetables were my own kitchen accidents and those awful cafeteria vegetables, neither of which offered any redeeming gustatory value.
The past few years though, I’ve come across vegetable dishes that are intentionally overcooked with great results. Green beans are particularly suited to this type of cooking as they contain a substance that is commonly found in wood and hemp, and thus require long slow cooking to make them digestible. Green beans reveal an entirely new character when braised long and slowly.
Most of the long-cooked green bean dishes I’ve encountered are basic braises of only a few simple ingredients. They all seem to have ethnic roots, like Syrian Lamb Stew with Green Beans or the locally popular Pennsylvania Dutch Ham and Green Beans. And then there is the Italian green been side dish I share here.
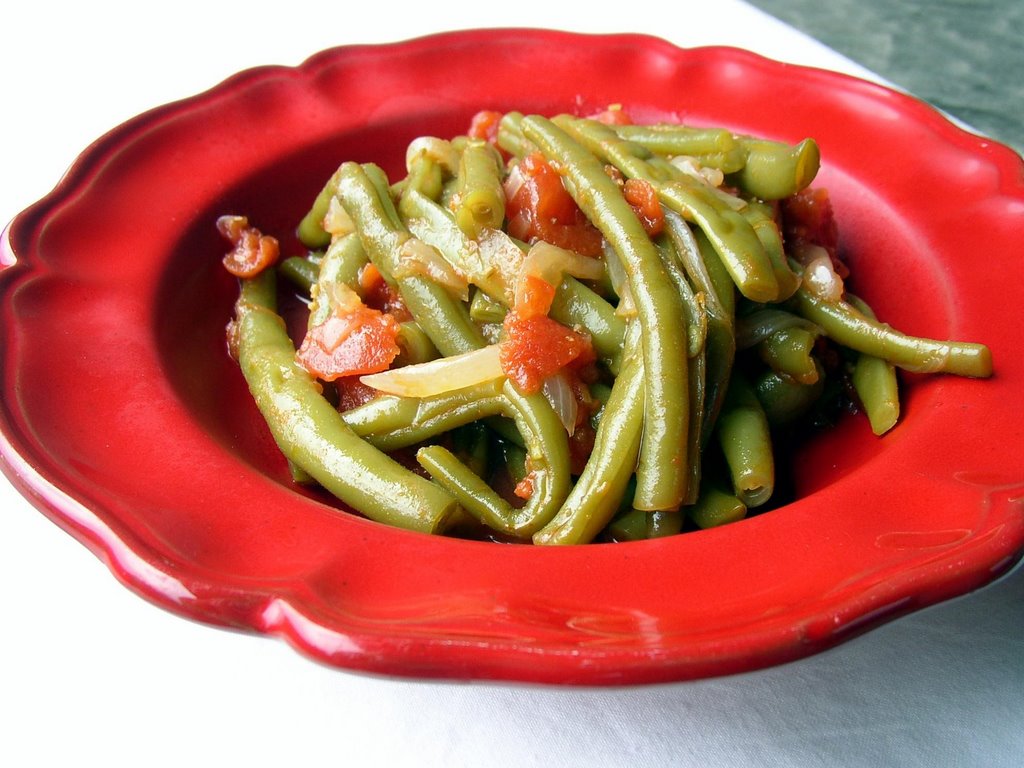
These green beans are cooked for 3 hours (yes, 3 hours) and, amazingly, they don’t disintegrate. They maintain their structure while becoming tender to the point of actually melting in your mouth. During their long braise they absorb the essence of the onions, tomatoes, and fennel seeds, while returning some of their own flavor to the broth, which begs your bread to sop it up. Another surprise is that the beans don’t turn that unappetizing brownish green color typical of overcooked green beans. Maybe it is the long slow cooking or perhaps the acid in the tomatoes helps them retain their greenness.
A note about preparing the fennel seeds: If you have one, use a mortar and pestle to coarsely grind the fennel seeds. Alternatively, you may chop them with a heavy chef’s knife, but first dampen both the seeds and the cutting board with water to prevent bits of seeds from flying all around the kitchen.
Braised Green Beans with Tomato and Fennel Seeds
Adapted from a recipe by Ed Bruske
in The Washington Post
2 tablespoons olive oil
1 medium yellow onion, peeled and cut into thin slices
1 pound green beans, trimmed and washed
14.5-ounce can diced tomatoes with juice
1 teaspoon freshly ground or chopped fennel seed
1/2 teaspoon salt
Freshly ground black pepper to taste
In a heavy pot with a tight-fitting lid over medium heat, heat the oil until warm. Add the onion and cook, stirring occasionally, until tender, about 5 minutes.
Add the beans, tomatoes with juice, fennel seeds, salt, and pepper and bring to a simmer. Cover, reduce the heat to very low and simmer gently until tender, about 3 hours, stirring and tasting the beans occasionally.
Taste and adjust the seasonings accordingly. Serve warm.
Tags: braised green beans, recipe, Italian
The Best Way to Roast Chestnuts at Home
One of the finest olfactory experiences one can enjoy occurs in the streets of Manhattan in the fall. Ascend the subway stairs from the stuffy station, up and out to the fresh, crisp November air, and collide with the delicious aroma of freshly roasted chestnuts from the nearby street vendors. Inhale deeply and enjoy!
The first time I encountered the scent of roasting chestnuts I was reminded of popcorn, but with deeper, richer overtones. I was immediately wary though, because I had been disappointed by popcorn’s seductive aroma which didn’t deliver what it promised. Popcorn, you palate teaser! You smell wonderful but you are nothing more than flavorless Styrofoam with tiny random hard bits that get stuck in my teeth. If it wasn’t for the butter and salt, I don’t think anyone would eat popcorn.
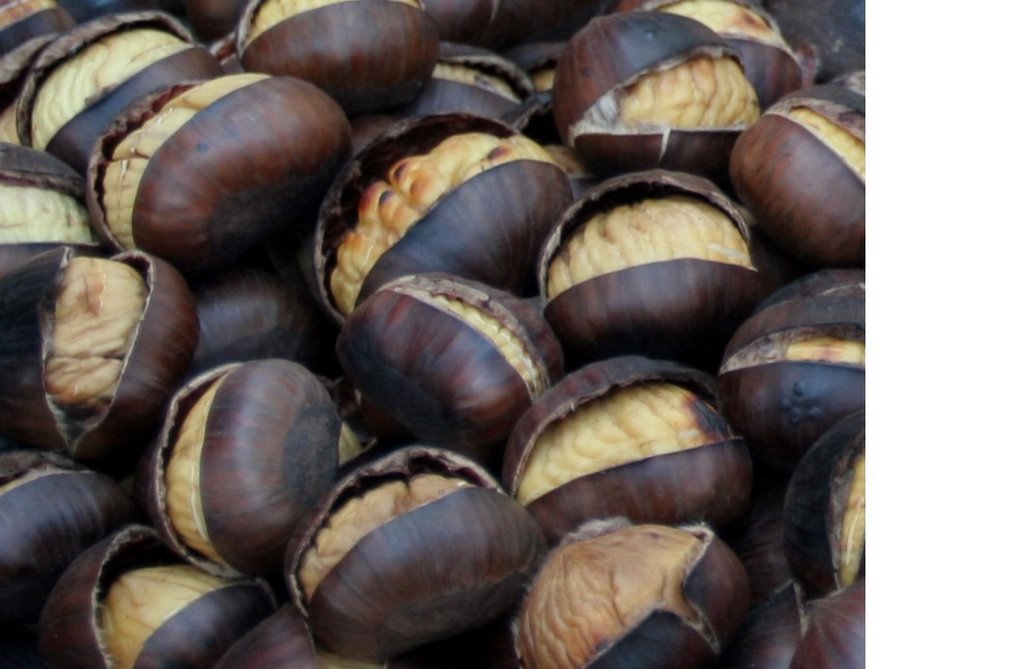
So you can understand why I approached my first roasted chestnut with some degree of trepidation. Would I be disappointed again? I held a warm chestnut in my hand and admired its beautiful brown shell with dark striped grain, like fine wood furniture. Its pale golden flesh with its gentle convolutions resembled a tiny brain. I took a bite. It was dense, nutty, sweet, and almost potato-like. Most importantly, it tasted like its aroma. It delivered!
If you won’t be in Manhattan in November you can still enjoy chestnuts in your own home. Most markets and grocery produce departments carry them this time of year. I’ve tried many ways of roasting chestnuts at home, and this method from Marcella
Hazen is the best. With this recipe you too can experience the wonderful aroma of Manhattan street food in your own kitchen.
Home-roasted Chestnuts
Preheat the oven to 475 degrees F.Wash the chestnuts in cold water and then soak them in warm water for 20 minutes. The soaking softens the shells and makes them easier to slash.
After soaking, use a small sharp paring knife to make a horizontal cut that partly rings the middle of each nut, starting at one edge of the flat side, circling the bulging belly of the chestnut, and stopping just past the other edge of the flat side. Do not cut into the flat side itself, and keep the slash shallow so that you do not cut into the chestnut meat.
Spread the cut chestnuts on a baking sheet and place on the middle rack in the hot oven. Toss the nuts from time to time, but not so often as to lose heat from the oven.
When the chestnuts are tender, about 30 to 45 minutes depending on their freshness, pour them off the baking sheet onto a clean cloth towel. Wrap them tightly in the towel and allow to rest for 10 minutes. They will steam a bit inside the towel, causing the skins to loosen much more easily.
Serve immediately.
Tags: chestnut, recipe, roasting
It should come as no surprise that my love of food, cooking, and eating extends to the accoutrements associated with those interests. Appliances, kitchen gadgets, fancy glassware, colorful placemats, and unusual serving bowls are as exciting to me as the first fresh peaches of the season.
I seem to have developed an immoderate fondness for plates. I just now inventoried my kitchen cabinets and my dish overflow area and counted 18 serving platters and 16 different sets of dinner plates. Not 16 plates, but 16 sets of plates, including two sets of Christmas plates and a complete service for 8 of Chinese rice pattern dishes. You would think sixteen sets of plates are sufficient for any household but I cannot stop buying them.
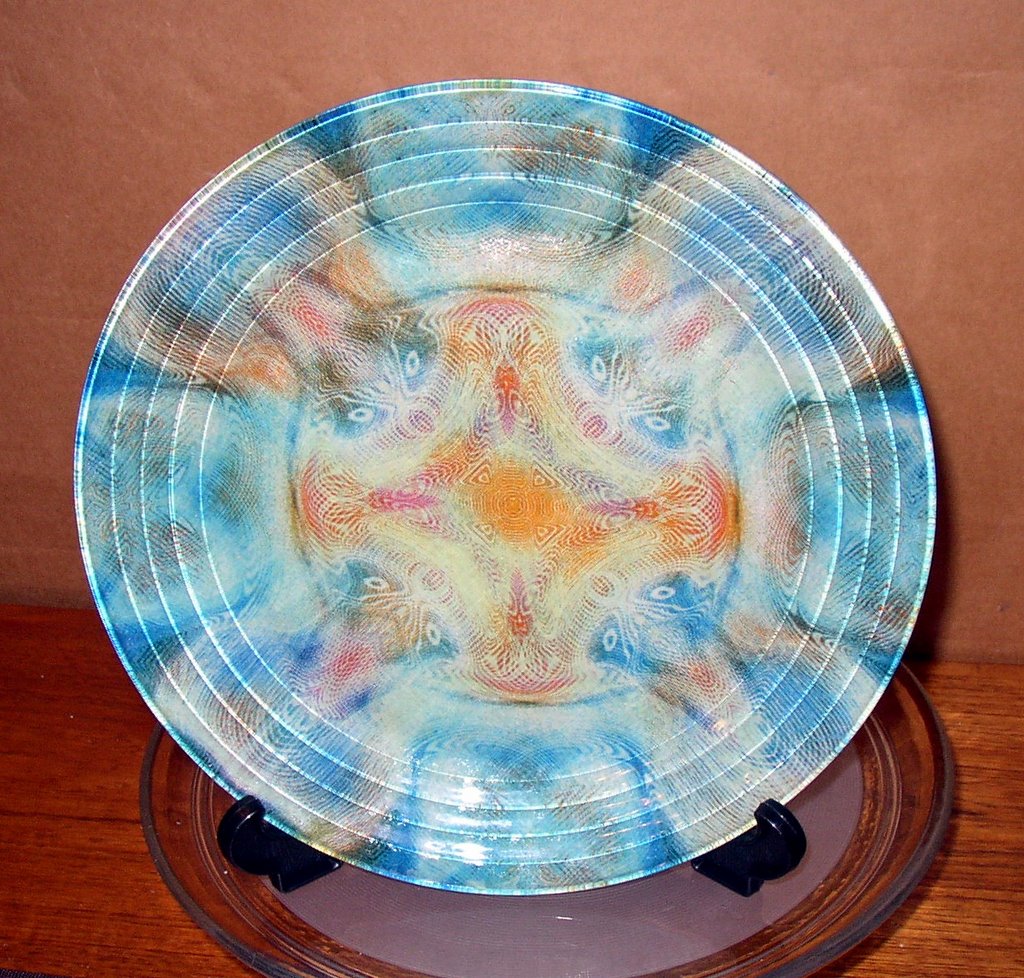
To exacerbate this affliction of mine, last year I discovered a new way to satisfy my plate cravings. I make my own! Wait, don’t go! These plates are beautiful, really. Here, see for yourself.
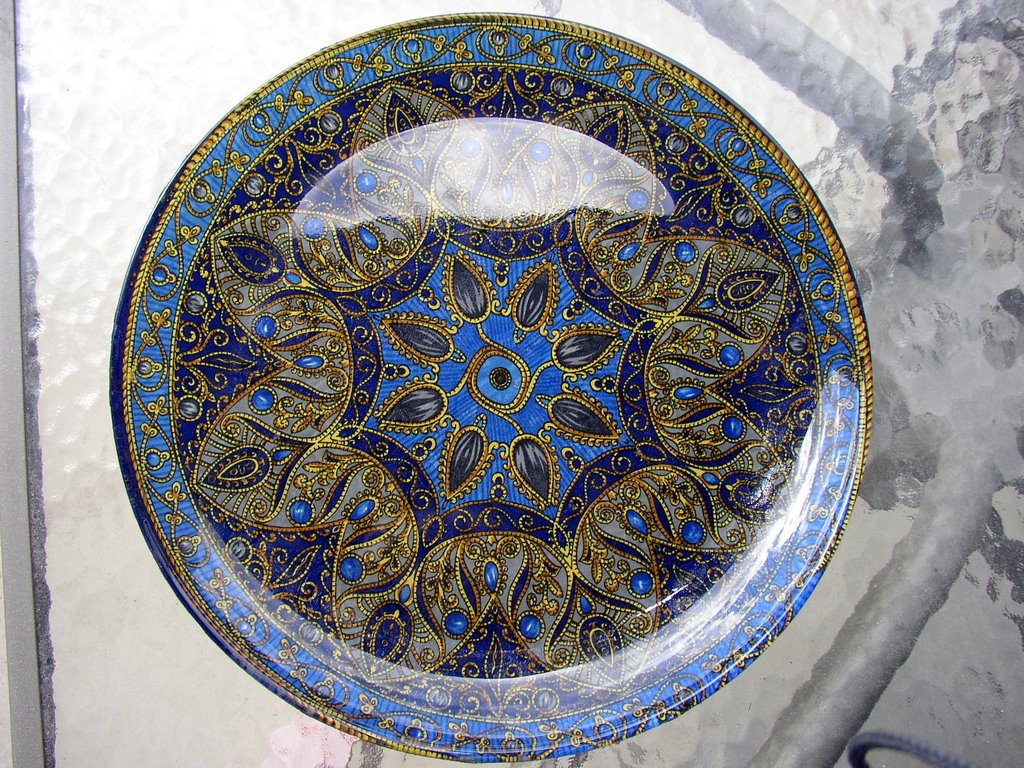 You can’t tell by looking, but my homemade designer plates are simply purchased clear glass plates with a beautiful fabric decoupaged on the back. That’s all there is to it. They are so simple to create and such a rewarding way to expand one’s kitchen creativity.
The one pictured above is a serving platter made with fabric cut from an inexpensive scarf I bought in Paris as a souvenir of my trip. Whenever I use this platter, I am reminded of that trip.
I use my custom plates as serving dishes when I bring cookies or other goodies to work. They also make very special hostess gifts. For Christmas I make plates with holiday-themed fabric to give as gifts, loaded with my homemade truffles. But best of all, I have created my own custom and totally unique place settings for my dinner parties.
I am so pleased with the beauty of these plates and the ease with which they are made, that I want to share the instructions with you so you can make your own plates too. My mother originally introduced me to the idea with verbal instructions. I researched it further and found more information. Then I experimented on my own and came up with what I consider the definitive method to make these.

How To Create Your Own Custom Designer Plates
Don’t be alarmed by the lengthy instructions here. I learned a lot during my experimentation so I am including every little detail. You won’t have to make any assumptions. Read through all of it first before you begin to work on your plates.
Materials
Fabric (see notes below)
Clear Glass Plates (see notes below)
Mod Podge, matte (available in craft and hardware stores)
Polyurethane (see notes below)
Cleaner for polyurethane
Fine Sandpaper
00 Steel Wool
Tools
Fabric scissors
1" Paint brushes and/or 1” Foam brushes
X-acto knife pen and plenty of extra blades
Working pedestals (see notes below)
Fabric Notes
Choose lightweight fabrics. Small patterns look good, as do patterns with large objects that can be centered on the plate. To get a good idea how the fabric will look as a plate, bring a pair of your clear glass plates to the fabric store and place the fabric between them. It already looks like a real plate!
Depending on the fabric width and pattern placement, you can get 2 - 4 dinner size plates from 1/2 yard of fabric. Wash and dry the fabric to remove the sizing as it will interfere with the absorption of the Mod Podge. If the fabric is wrinkled after laundering, iron it.
Clear glass plates notes
Use clear glass plates that are smooth on the back (no texture patterns). A subtle pattern on the front is okay as long as the back of the plate is smooth. The flatter the back of the plate, the easier it is to cover it with fabric. Some sources for inexpensive clear plates are Wal-Mart, dollar stores, Linens ‘n’ Things, and K-Mart. You can also buy them online but shipping costs may make them a bit expensive.
![]() Wash the plates well in warm soapy water and rinse. Be sure to remove all labels and adhesives. Goo Gone works well to get rid of that annoying adhesive residue.
Wash the plates well in warm soapy water and rinse. Be sure to remove all labels and adhesives. Goo Gone works well to get rid of that annoying adhesive residue.
Finally, right before starting the project, clean the back of the plate with glass cleaner and a lint free towel or paper. Do not allow your fingers to touch the back of the plate once it is clean. It will leave invisible marks that may interfere with the glue.
Polyurethane notes
There are two types of polyurethane; oil based and water based. The oil based type makes very noxious fumes and requires good ventilation. It also requires special cleansers to clean the brushes. But it is waterproof and will make your plates hardier.
The water based polyurethane is easier to use and clean up but is not water proof. I like to use the oil based polyurethane for the first two or three coats and then use the water based for subsequent coats.
If your plates will be solely decorative, then you may use the water-based polyurethane. If you plan to use your plates for serving food (and thus will be washing them) then you should use the combination of polyurethanes, as I do.
Working pedestals notes
You will need to place the plate on a small raised pedestal while working on it and while it dries. Plastic deli containers turned upside down work well. You may also use glass custard cups or ramekins turned upside down.
Paint Brushes versus Foam Brushes
Purchase both types and try them to determine which works best for you. I use the regular paint brushes to apply the Mod Podge but prefer the foam brushes for the polyurethane.
Miscellaneous tips
I cover my entire work surface with a large piece of heavy corrugated cardboard. It gets covered with drips and spatters of Mod-Podge and polyurethane, so when I’m all done, I just throw it away.
No matter how careful you are as you follow the directions below, as you apply the Mod Podge and polyurethane, you will get it on your fingers and then get it on the front of the plates. Try to avoid this but if it occurs, don't worry about cleaning it up immediately. Just leave it. Later we will use steel wool to remove extraneous Mod Podge and polyurethane.
It is just as easy to create 8 – 12 plates at a time, assembly line fashion, as it is to do one. So make a bunch.
Instructions
Cutting the Fabric
Place the fabric between two plates, arranging the pattern in a pleasing way. Use fabric scissors to cut out the fabric, leaving a one inch border around the plate.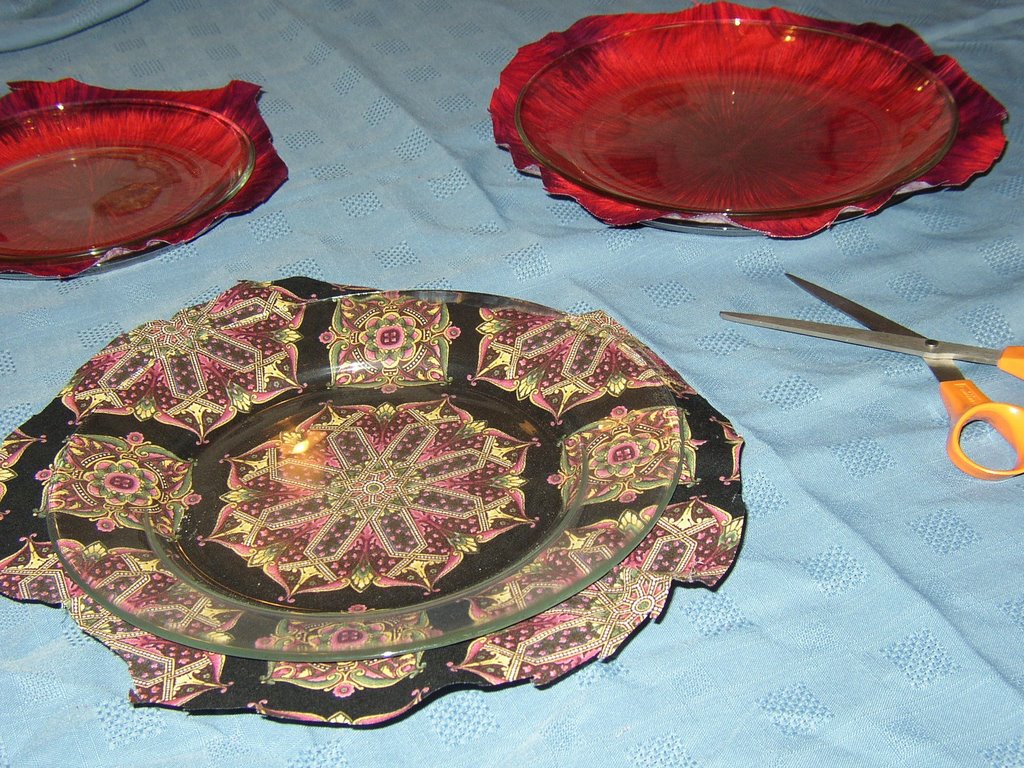 Covering the Plate
Place the plate, face down, on a working pedestal. Brush a very thin coat of Mod Podge over the back surface of the plate.
Place the fabric circle face up on a covered surface (heavy cardboard works well) and brush with Mod Podge, almost to the edges. It is easier to do this by painting from the center outwards, starting at 12 o'clock and working around the circle.
Center the plate, face up, over the fabric and press down. Carefully flip the plate over and place it face down on a working pedestal. Move the fabric around to insure it is centered, pulling and smoothing it. If necessary, lift up the fabric around the edges and reposition it. Working from the center out, press the fabric smooth against the glass, working out any wrinkles, bumps, and air bubbles until the fabric is pressed very firmly to the back of plate all the way to the edges of the plate and perfectly smooth.
Your fingers will get a bit sticky during this. After you are satisfied that the fabric placement is just right, go ahead and wash your hands if you feel like you have to. Or keep a bowl of warm water and a small towel nearby.
Brush a thin layer of Mod Podge over the back of the now fabric-covered plate. First do the center, then the rim area. Be sure it is evenly covered beyond the edges of the plate. If the brushing causes any wrinkles or bumps be sure to smooth them out.
If making several plates, as I recommend, do them assembly line fashion. That is, cover all the plates through this step before proceeding to the next step.
Allow to dry. The Mod Podge is a whitish color when wet but it will dry clear. As the plates dry, watch for the appearance of air bubbles. If they occur use a sharp pin to pierce them from the side and then press flat. The plates should be dry in a couple of hours.
 Trimming the Plate
Use the Xacto knife to trim the excess fabric from the plate, trimming right to the edge of the plate. The fabric should not cover the plate edge. Here's how I do it:
Sit in a chair at a table. You may wish to place a towel or other covering across your lap to catch the bits of fabric. Rest the edge of the plate on your lap with the eating side facing you. Let the plate lean against the table for support. With a gentle sawing motion, use the Xacto knife to trim the fabric from the edge of the plate. The sawing motion should be towards you in case there is a section of fabric not tightly adhered to the plate so it doesn't loosen. The blade should always be at 12 o'clock and you turn the plate as you go.
After removing the excess fabric, there will still be sections where it isn't flush with the rim. Do the trimming a second time. Don’t worry if the edge isn’t perfectly smooth. Subsequent steps will resolve that.
If you come across gaps between the edge of the plate and the fabric, dampen that section of the fabric a bit, place a few drops of Mod Podge in the gap and press the fabric tightly to the plate. Brush additional Mod Podge on the fabric, press smooth and allow to dry.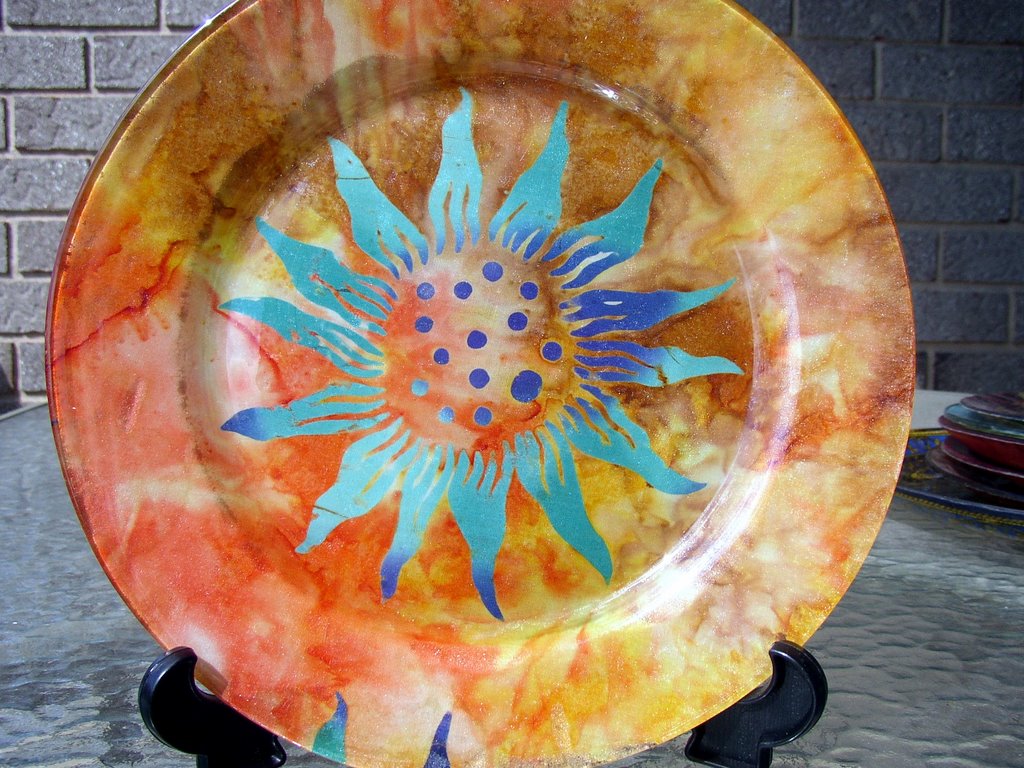 Polyurathane the Plate
Place the plate face down on a working pedastal. Brush a thin layer of polyurethane over the fabric. Work from the center out. It should be a very thin coat. After the back is covered, wipe the brush against the paint can to remove excess polyurethane and run the side of the brush around the rim edge of the plate to remove any excess polyurethane. Or use a clean foam brush or rag to do this. Allow to dry for the period of time recommended by the manufacturer of the polyurethane.
If you see drips of polyurethane start to hang from the edge of the plate like stalactites, you’ve used too much. Wipe off those blobs of drops before they harden.
When using oil based polyurethane, rather than cleaning the brushes in between every coat, I leave the brush in a plastic container large enough to hold the brush upright, pour in just enough of the cleanser to cover the bottom of the brush, and place the lid tightly on the container. The large plastic soup containers from the Chinese take-out work perfectly for this. When using foam brushes take care not to submerge them entirely in the cleanser or the glue that holds the foam to the handle will dissolve and you’ll end up with a stick and sponge. When ready for the next coat just shake out the brush, rinse, shake again, and dry with paper towels.
Apply a second coat and allow to dry for the period of time recommended by the manufacturer of the polyurethane.
When the second coat of polyurethane has dried, use 00 steel wool to smooth the back of the plates. Wipe away the dust with a damp sponge and paper towel and apply another coat of polyurethane. Continue this process until the backs of the plates are as smooth and shiny as the front. Use very thin coats of polyurethane. I usually apply 1 – 2 coats per day, over the course of several days, spending only 5 – 10 minutes a day on the project. Having a work area dedicated to this process is important.
Finishing Touches
Trim the edges of the plates once again, using the exacto knife as previously described. This time you will be removing excess dried polyurethane along with any excess fabric. Go around the plate a second time the same way.
Using fine sand paper wrapped around a small piece of wood, sand the edges of the plates. Then do the same with the 00 steel wool.
Finally, use the steel wool to remove any extraneous Mod Podge and polyurathane from the front of the plate. Run your fingertips over the surface of the plate to identify any specs and use the steel wool in a circular motion to remove them.
Wash gently and dry.
Care instructions:
These plates must NOT be washed in the dishwasher. Wash quickly in warm soapy water, rinse and dry. Do not soak.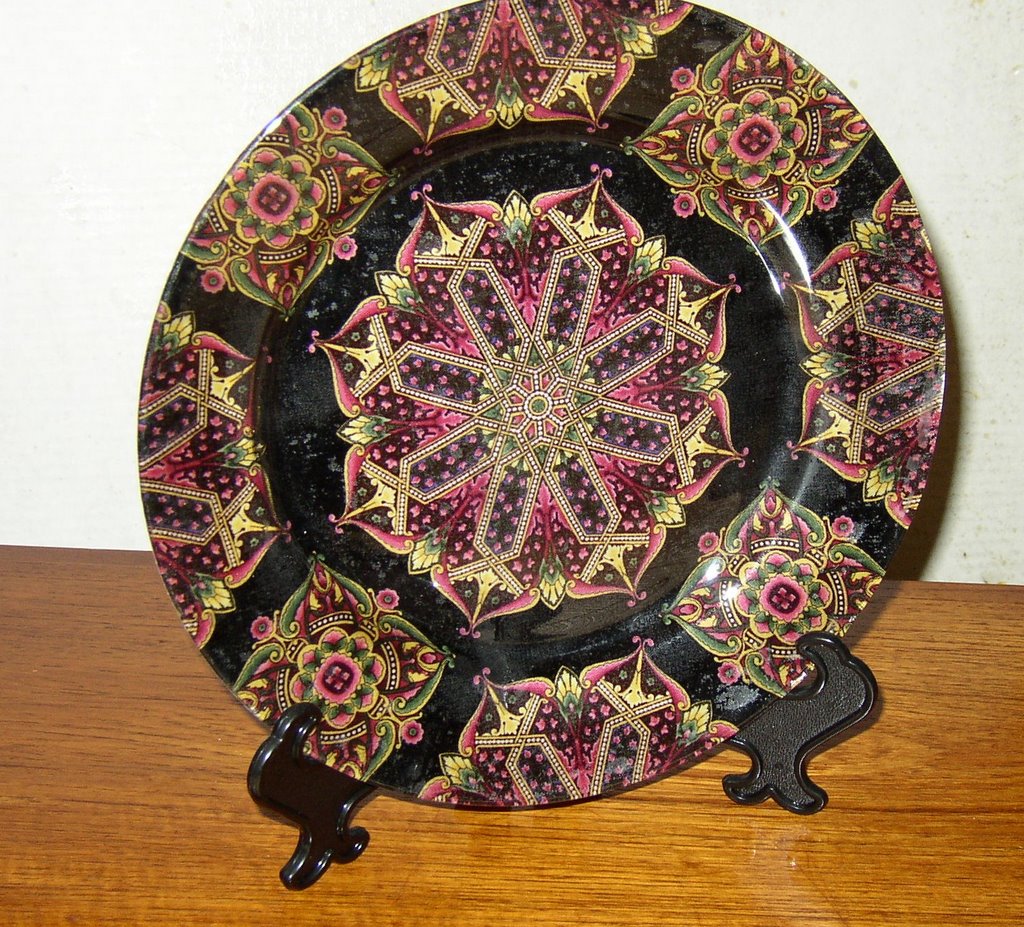
Tags: decoupage plates, instructions, fabric
Artichoke for One
I was raised on artichokes. The family dinner table would often include a plate of artichokes as casually as other family’s tables include a basket of bread. The artichokes were always prepared the same way, Italian style, stuffed with fresh garlic, breadcrumbs, parsley, and parmesan cheese, drizzled with lots of olive oil, and then braised until tender.
To me artichokes are comfort food but many of my friends and acquaintances here in gastronomically provincial central Pennsylvania have had no exposure to fresh artichokes and look upon them with a combination of horror and mistrust. I’ve learned to introduce artichokes only to those with open-minded palates.
Because of that, I don’t make artichokes as frequently as I would like to eat them. My old family recipe is time consuming, thus worthwhile preparing only when making a batch of artichokes. So whenever I crave an artichoke, I usually let the craving pass rather than satisfy it…until I discovered a quick and simple microwave method to make an artichoke for one.
Admittedly, these are not as soul-satisfying as my mother’s Italian style artichokes, but they do appease that artichoke craving with only a few minutes of effort.
An odd note about artichokes - don’t bother drinking wine with them. Artichokes contain some chemical that makes anything you drink with them (even water) taste sweet.
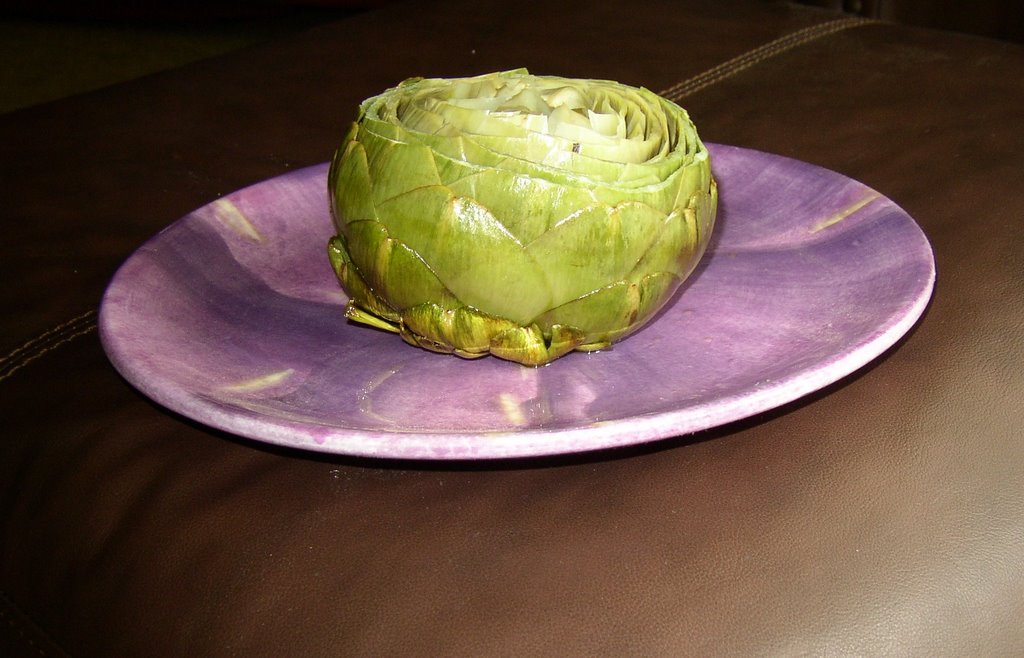
Microwave Artichoke for One
1 large artichoke
1 - 2 garlic cloves, finely chopped
1 -2 tablespoons olive oil
Trim artichoke stem flush with base. Slice top inch off artichoke. Pull off any loose or damaged outer leaves from the base. Use a pair of scissor to trim the sharp tips off the outer leaves.
Place the artichoke upside down in a 4 cup glass Pyres measuring cup. Sprinkle garlic over it. Pour in water to cover the bottom third of the artichoke. Drizzle with the olive oil.
Cover tightly with plastic wrap and poke a couple holes for the steam to escape. Microwave on high power for 10 to 15 minutes or until the stem is tender (poke it with the tip of a knife).
Turn the artichoke around in the liquid to moisten all the leaves and let rest, covered, for 5 minutes before serving.
Tags: artichoke, Recipe, microwave